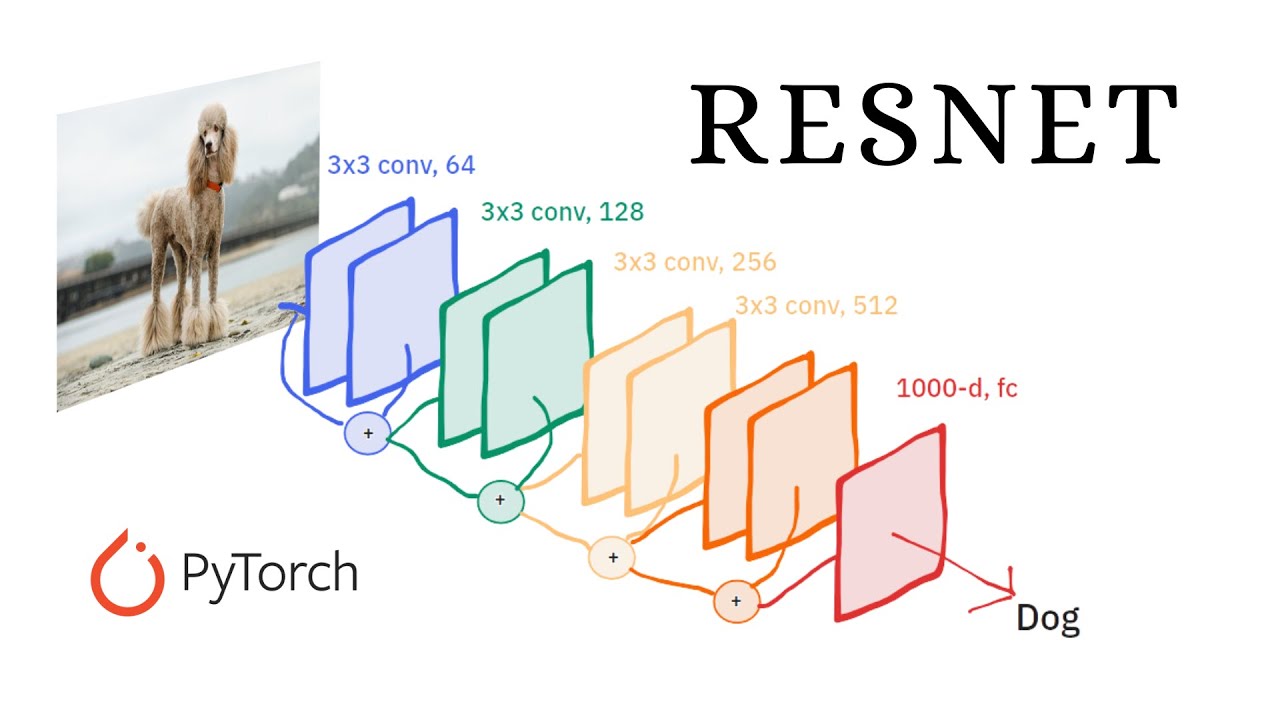
ResNet 모델 설명 with pytorch
이미지 넷 모델 리뷰
Introduction
ResNet은 인공지능 역사에 정말 큰 영향을 미친 모델이다. 해당 모델은 Deep Residual Learning for Image Recognition에서 발표 되었으며, 2025년 현시점 인용수가 약 25만 건으로, 가장 영향력이 큰 논문으로 평가받는 논문이다. 해당 모델은 간단한 아이디어지만 성능에 큰 영향을 주는 Skip(residual) connection을 제안하여 2015년 ILSVRC(ImageNet Large Scale Visual Recognition Challenge)에서 우승한 모델이다. 뿐만아니라 2014년 우승한 모델인 GoogleNet이 22층의 레이어를 쌓은데 반해 Resnet은 152층으로 약 7배나 깊어졌다. 그리고 해당 모델은 처음으로 인간의 분류 능력을 뛰어넘었다는 점도 의미가 있다. 그리고 해당 논문은 차후에 트랜스포머의 모델 구조에서도 이용되며 모든면에서 인공지능 발전에 있어 큰 영향을 주었다.
Background
AlexNet의 등장 이후로 많은 딥러닝 모델이 등장했다. ResNet 모델이 등장하기 전에도 딥러닝 모델에서 모델의 depth와 width를 키웠을 때 성능이 좋아진다는 것에 대해서는 모두가 공감하였다.
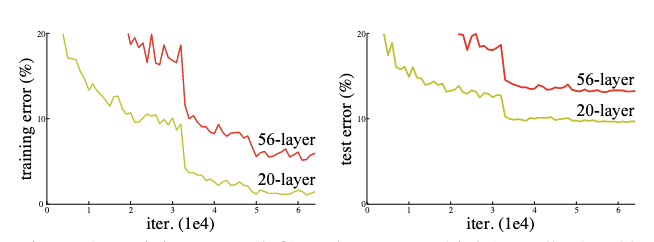
그렇다면 단순하게 층을 깊게 만든다면 모델의 성능이 좋아질까? 그렇지 않다. 위 figure를 보면 왼쪽은 training error를 오른쪽은 test error를 나타내는데, 모델이 더 깊을 때(56층 일때) 오히려 더 높은 error를 보이는 것을 알 수 있다. 심지어 test에서만 성능이 안좋은게 아닌 train을 할때도 성능이 좋지 않다. 이는 overfitting과 같은 이유가 아닌 어떠한 이유로 인해 학습이 재대로 되고 있지 않다라고 생각할 수 있다.
여기서 ResNet의 논문의 저자는 해당 문제를 Degradation Problem 때문에 발생한다고 한다. Vanishing/Exploding Gradient와 다르게 모델이 수렴함에도 깊어짐에 따라 성능이 저하가 발생하는 것이다.
Residual learning
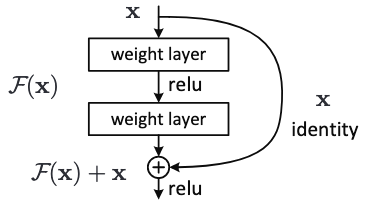
여기서 ResNet의 핵심 개념인 Residual Learning이 등장한다. Residual의 경우 잔차로 해석될 수 있고, 이는 잔차를 학습한다로 생각 될 수 있다.
해당 개념은 직관적이다. 기존의 딥러닝 모델에 지름길을 뚫어주자는 것이다. 기존의 모델은 한 레이어의 출력을 다음 레이어의 입력으로 주는 것의 반복이었다. 여기서 저자는 다음 레이어에 입력 값을, “전 레이어의 출력값 + 전레이어의 입력 값” 으로 주자는 것이다. 즉 다음 레이어에 값을 줄 때 그 전의 값이 전달 될 수 있는 지름길을 만들어주는 것이다.
그렇다면 왜 이렇게 지름길을 만들어주는 걸까? 그 이유는 위에서 언급했던 앞쪽의 레이어는 gradient가 점점 재대로 전달 되지 않는다는 문제가 있었으니, gradient가 흐를 수 있는 통로를 만들어준다고 생각하면 된다.
또 다른 관점으로 생각해보면 모델에게 있어 제약을 걸어준다는 관점으로도 볼 수 있다. 예를들어 1이라는 값이 한 레이어를 거쳐 1.3이라는 값이 나온다 가정하면, 기존에는 레이어가 1이라는 입력값을 어떻게든 1.3으로 변화시키는 방법에 대해 익히려고 노력해야 할 것이다. 하지만 레이어의 입력값을 출력값에 보내준다면, 모델이 학습해야하는 것은 1과 1.3의 차이인 0.3을 학습해야할 것이다. 즉 레이어 입장에서는 값을 통째로 바꾸는게 아닌 출력값에서 입력값을 제외한 나머지 정보만을 학습하면 되는 것이다. 이는 모델에게 “너희는 이 부분만 학습하면 돼”라고 제약을 걸어준다고 생각할 수 있다. 따라서 이를 잔차를 학습한다하여 residual learning이라 부른다.
ResNet 수식
\[y = \mathcal{F}(x, \{ W_i \}) + x\]- $x$ : 입력 벡터
- $y$ : 출력 벡터
- $\mathcal{F}()$ : 학습해야할 함수(residual mapping)
- $W_i$ :학습해야할 가중치
ResNet은 수식도 매우 간단하게 표현이 된다. 직관적인 수식이기에 설명은 생략한다
\[y = \mathcal{F}(x, \{ W_i \}) + W_s x\]위 수식을 이해했다면 다음 수식을 이해하는건 더 간단할 것이다. 해당 수식은 원래의 입력 벡터가 레이어를 거치면서 차원이 달라지는 경우가 있는데 이를 linear projection해주는 것이다. 이는 보통 1x1 Conv를 통해서 차원을 변형시켜준다.
ResNet Architecture
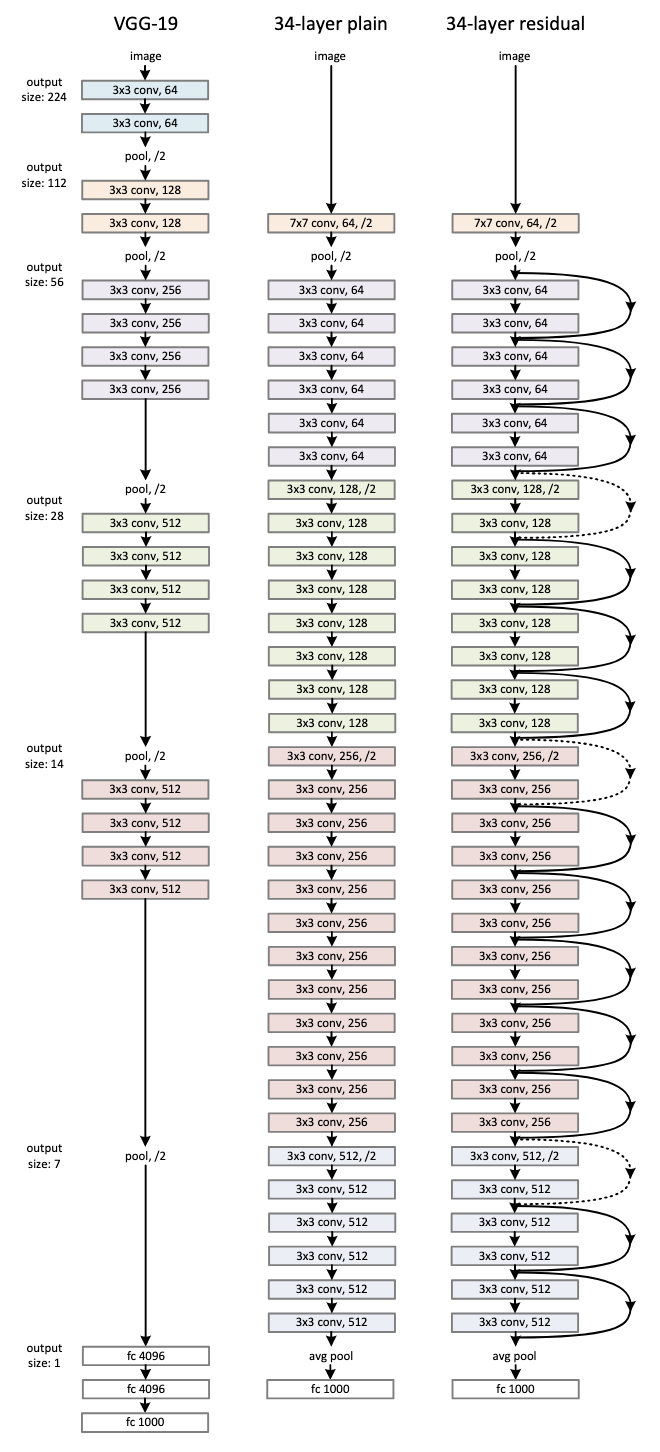
ResNet은 VGGNet과 비슷한 방향으로 모델을 구성하였다. VGGNet의 철학을 본받아 모든 Conv연산을 3x3으로 진행하며, Pooling을 할 때마다 채널의을 2배로 늘려주어 레이어별 연산량을 유지시킨다.
ResNet Module
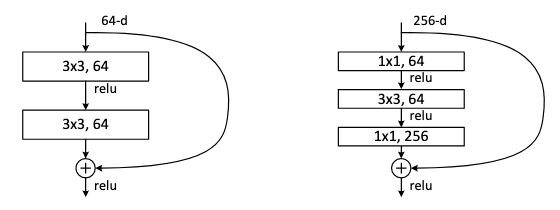
ResNet은 연산량의 문제로 두가지 모듈을 사용한다. 정확히는 ResNet-34(34는 레이어 층수를 의미)에는 지금까지 언급한대로 3x3 연산을 2번 진행한 후 skip connection을 진행하는 방식으로 진행한다. 위 사진에서 왼쪽에 해당한다.
하지만 ResNet-50/101/152 처럼 층수가 커질 경우 필연적으로 연산량이 엄청나게 늘어날 것이다. 레이어가 깊어질 수록 채널의 수는 늘어날 것이고, 이에 따라 3x3 Conv연산을 해야하는 채널은 당연히 늘어나게 된다.
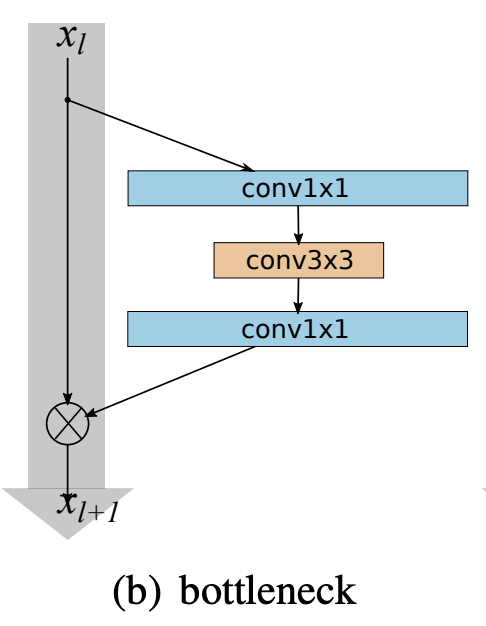
이를 해결하기 위해 논문에서는 Bottleneck이라는 블록을 제안한다. 이는 위의 사진에서 오른쪽에 해당하고 좀 더 보기 쉬운 형태의 figure를 첨부하였다. 쉽게 말해 1x1 $\rightarrow$ 3x3 $\rightarrow$ 1x1의 Conv연산을 하는 블록이다. 그렇다면 왜 이런 연산을 하는 것일까.
1x1 Conv 연산은 Inception Module을 설명할 때도 연산량을 줄이기 위해 채널을 조절하는 방법의 일환으로 소개된적이 있다. 그렇다보니 3x3 Conv 연산 전에 미리 채널을 줄여 연산량을 줄이고 다시 1x1을 통해 원래의 채널로 복구해주는 방법을 사용하는 것이다. 그렇다보니 3x3 Conv연산을 할때만 채널의 크기가 줄어 일종의 병목 현상처럼 보여, 해당 블록의 이름도 bottleneck로 지어진 것이다.
ResNet 코드 분석
def conv3x3(in_planes: int, out_planes: int, stride: int = 1, groups: int = 1, dilation: int = 1) -> nn.Conv2d:
    """3x3 convolution with padding"""
    return nn.Conv2d(
        in_planes,
        out_planes,
        kernel_size=3,
        stride=stride,
        padding=dilation,
        groups=groups,
        bias=False,
        dilation=dilation,
    )


def conv1x1(in_planes: int, out_planes: int, stride: int = 1) -> nn.Conv2d:
    """1x1 convolution"""
    return nn.Conv2d(in_planes, out_planes, kernel_size=1, stride=stride, bias=False)
그동안 이미지넷에서 봤던 것과 마찬가지로 torchvision의 resnet 구현 코드를 가져왔다. 우선 Conv2D를 만들어주는 2개의 메소드가 존재한다. 3x3과 1x1 두개의 Conv 레이어를 만들어주는 헬퍼 메소드로 보면 된다.
class BasicBlock(nn.Module):
    expansion: int = 1

    def __init__(
        self,
        inplanes: int,
        planes: int,
        stride: int = 1,
        downsample: Optional[nn.Module] = None,
        groups: int = 1,
        base_width: int = 64,
        dilation: int = 1,
        norm_layer: Optional[Callable[..., nn.Module]] = None,
    ) -> None:
        super().__init__()
        if norm_layer is None:
            norm_layer = nn.BatchNorm2d
        if groups != 1 or base_width != 64:
            raise ValueError("BasicBlock only supports groups=1 and base_width=64")
        if dilation > 1:
            raise NotImplementedError("Dilation > 1 not supported in BasicBlock")
        # Both self.conv1 and self.downsample layers downsample the input when stride != 1
        self.conv1 = conv3x3(inplanes, planes, stride)
        self.bn1 = norm_layer(planes)
        self.relu = nn.ReLU(inplace=True)
        self.conv2 = conv3x3(planes, planes)
        self.bn2 = norm_layer(planes)
        self.downsample = downsample
        self.stride = stride

    def forward(self, x: Tensor) -> Tensor:
        identity = x

        out = self.conv1(x)
        out = self.bn1(out)
        out = self.relu(out)

        out = self.conv2(out)
        out = self.bn2(out)

        if self.downsample is not None:
            identity = self.downsample(x)

        out += identity
        out = self.relu(out)

        return out
해당 코드는 ResNet-18과 34에서 사용하는 블록이다. 즉 레이어 수가 적고, 연산량이 적은 모델에서 사용하는 블록이다. 해당 모델에서 expansion은 1로 출력 채널 = 입력채널 관계를 갖는다. 해당 모델은 간단히 볼때 Conv3x3 $\rightarrow$ Conv3x3 구조를 갖는다. 또한 ResNet이므로 처음에 입력값을 identity에 저장해놓고, 2번의 Conv3x3를 지난 후 결과 값에 해당 값을 더해주게 된다.
class Bottleneck(nn.Module):
    # Bottleneck in torchvision places the stride for downsampling at 3x3 convolution(self.conv2)
    # while original implementation places the stride at the first 1x1 convolution(self.conv1)
    # according to "Deep residual learning for image recognition" https://arxiv.org/abs/1512.03385.
    # This variant is also known as ResNet V1.5 and improves accuracy according to
    # https://ngc.nvidia.com/catalog/model-scripts/nvidia:resnet_50_v1_5_for_pytorch.

    expansion: int = 4

    def __init__(
        self,
        inplanes: int,
        planes: int,
        stride: int = 1,
        downsample: Optional[nn.Module] = None,
        groups: int = 1,
        base_width: int = 64,
        dilation: int = 1,
        norm_layer: Optional[Callable[..., nn.Module]] = None,
    ) -> None:
        super().__init__()
        if norm_layer is None:
            norm_layer = nn.BatchNorm2d
        width = int(planes * (base_width / 64.0)) * groups
        # Both self.conv2 and self.downsample layers downsample the input when stride != 1
        self.conv1 = conv1x1(inplanes, width)
        self.bn1 = norm_layer(width)
        self.conv2 = conv3x3(width, width, stride, groups, dilation)
        self.bn2 = norm_layer(width)
        self.conv3 = conv1x1(width, planes * self.expansion)
        self.bn3 = norm_layer(planes * self.expansion)
        self.relu = nn.ReLU(inplace=True)
        self.downsample = downsample
        self.stride = stride

    def forward(self, x: Tensor) -> Tensor:
        identity = x

        out = self.conv1(x)
        out = self.bn1(out)
        out = self.relu(out)

        out = self.conv2(out)
        out = self.bn2(out)
        out = self.relu(out)

        out = self.conv3(out)
        out = self.bn3(out)

        if self.downsample is not None:
            identity = self.downsample(x)

        out += identity
        out = self.relu(out)

        return out
다음은 ResNet의 Bottleneck 구조이다. 해당 모듈은 ResNet-50, 101, 152에 사용된다. 깊은 층을 쌓아야하다보니 연산량을 줄이기 위해 Conv1x1 $\rightarrow$ Conv3x3 $\rightarrow$ Conv1x1 구조를 사용한다. 여기서 expansion은 4로, 출력채널의 수가 입력채널의 4배가 된다.